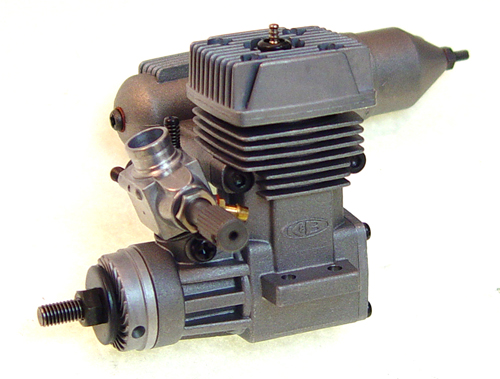
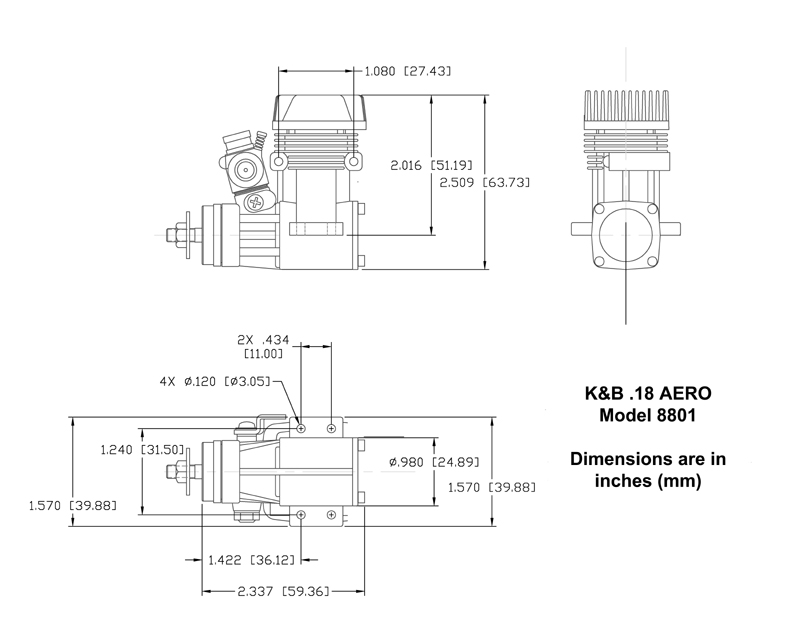
Instructions for your
.18 AERO ENGINE
Part No. 8801

 
SPECIFICATIONS
Bore & Stroke
16.4 mm x 13.5 mm --- 0.646" x 0.531"
Displacement
3 ccm --- .18 cu. in.
Weight
engine - 6.05 oz; muffler - 1.9 oz
Crankshaft thread
5 x .8 mm
Crankshaft bearing
double ball bearing
Connecting rod type
super alloy bronze bushing both ends
Piston/cylinder type
aluminum piston, brass cylinder with hard plating
Carburetor
single needle with idle air bleed
Porting type
Schnuerle ports with boost port
Glow Plug
K&B 1L Standard Long
Horsepower
1.15 with tuned pipe & 30% nitro
Practical RPM range
2,500 ~ 19,000
Max RPM
19,000
Prop size
8x6 - 9x5
Recommended fuel
5~15% nitro (minimum 18% oil by volume)
Running temp
-
Warranty
2 year limited warranty against defects.
See warranty for details.
Pull starter
not available
Muffler/pipe
standard muffler


PLEASE READ THESE INSTRUCTIONS COMPLETELY TO FAMILIARIZE YOURSELF WITH THE FEATURES AND OPERATION OF YOUR NEW K&B ENGINE.

CAUTION

K&B engines will constantly give you dependable performance and reliability and will be a source of satisfaction and pleasure if you follow these instructions as to the engine's proper care and tuning.

You are responsible for the safe operation of your engine, so act sensibly and with care at all times. This K&B model engine is not a toy. It is a precision-built machine whose power is capable of causing serious injury to yourself and others if abused, misused, or if you fail to observe proper safety precautions when using it.

Never use any other fuel in your engine other than glow fuels specifically designed for use in model car engines. NEVER use any other types of fuel as these can cause severe damage to the engine, or personal injury. NEVER use gasoline!

Never operate your model on any public streets, parking lots, sports fields, or sidewalks. This could cause traffic, accidents, personal injury, or property damage.

Glow engines produce exhaust gases that are poisonous and can be dangerous to your health. It is important that you operate your engine outdoors only.

Before starting the engine, make sure the throttle arm is set to the idle position. Starting the engine at any setting above idle can cause the car to launch out of your hands.

When the engine is running, there are parts that rotate at high speed. Be careful not to touch the drive belts, gears, clutch assembly, or any other moving part. Serious injury could result.

It is normal for an engine to get very hot during operation, especially the cylinder head and muffler or tuned pipe. Never touch the engine or muffler assembly during or soon after running, they could be very hot and can cause serious burns.

Model engines vibrate when they are running. Periodically check all the engine screws, mounting screws, muffler screws, and other assemblies to ensure they are tight. Running the engine with loose screws can lead to severe engine and/or chassis damage.


INSTALLATION

These engines are designed for beam type mounting. Securely mount the engine an hardwood mounts or on the beam of a good quality firewall mount. Be sure the mounting surface is flat and parallel and all mounting holes line up. Take care to maintain this parallel relationship in that the crankcase could become distorted if screws or mounting is forced. We strongly advise against using a soft or rubber mount installation. Even though our engines are correctly balanced, these mounts can cause excessive vibrations from resonance frequencies. Do not use a back cover mounting plate as the engine backplate bosses are not designed to withstand the torque of the engine. The fuel tank should be located as close to the engine as possible. The center line of the tank should be within 1/2 inch above or below the center of the carburetor. Muffler pressure to the fuel tank must be provided.
 

STARTING PREPARATIONS

Use a LONG REACH PLUG (such as the K&B 7311) OR R/C IDLE BAR PLUG (such as K&B 4520). Your will also need a 1.5 volt battery, quality propeller (refer to prop chart below) and good, commercial grade, two cycle glow fuel with 5% nitro-methane (more helps in cold weather). Be sure the fuel contains the right percentage of oil (18-20%) and that the oil is made up of a blend of castor oil and synthetic oil (not all synthetic oil). Keep fuel clean and filter it during fueling. Keep the exposure of your fuel to the air at a minimum as methanol will absorb moisture rapidly.
 

FUEL RECOMMENDATIONS & SPECIFICATIONS

BREAK-IN FORMULA: A mixture of 22% Degummed castor oil (or castor/ synthetic oil blend), 5% nitro-methane, and 73% methanol.

AFTER BREAK-IN: The nitro-methane percentage may be increased to 15% and oil content may be decreased if desired. However, never use fuel with less than 18% total oil content.

NOTE: In spite of certain fuel manufacturer's claims, always be sure that your fuel contains at least some castor oil in it's formulation. Even if as little as 12 to 15% of the the total quantity of oil in your fuel consists of castor, that small amount of castor oil will provide much needed protection for your engine when it is being called upon to provide you with its maximum output. As the manufacturer of this engine, K&B specifies that some castor oil in your fuel is a necessary and essential fuel component and is a requirement for maximum protection of your engine during its life.

LOW QUALITY FUELS OR FUELS WITH AN INADEQUATE OIL CONTENT CAN RUIN YOUR ENGINE IN A SHORT PERIOD OF TIME.


PROPELLER SIZES

Service
Recommended Prop
Break-in
7x6 8x3 8x4
Normal use
8x5 9x5
 

STARTING & BREAK-IN

All K&B engines are produced to the highest standards and inspected before leaving the factory, but they are not "BROKEN-IN" and will require approximately 30~45 minutes running before the full potential of the engine is realized. Break-in can be achieved "on the bench" or in the air.

Model engines make sounds that will tell you how they are performing or what they are doing. You'll have to listen very carefully for these sounds, recognize their message, and make adjustments to the fuel control needle valves accordingly. The mixture of fuel and air is controlled by the amount of fuel metered by the needle valve.

Running "RICH" is a condition when the engine has a very slow, sometimes irregular, sputtering and almost sloppy exhaust sound. The exhaust will be very smoky, will probably contain small drops of oil and even drops of raw fuel. RUNNING RICH IS NOT GOOD FOR BREAK-IN of your K&B .18 Aero engine which is an ABC type. The engine, at this speed, runs much cooler than it should and is subject to premature wear.

"FOUR CYCLE" is a still a rich setting. Though slow, it is fast enough to properly heat the engine's components and will even pull the airplane in flight. THE 4-CYCLE SPEED IS GOOD FOR BREAK-IN. This is also the setting you normally look for before launching the airplane because the engine will run leaner when airborne.

PEAKED OR "TWO CYCLE" - As the main needle is closed (clockwise), it reduces the amount of fuel mixed with the air drawn into the engine. At a specific point, which varies with each engine, air temperature, altitude and relative humidity. At "two-cycle", the exhaust note will change quickly into a smooth, powerful note.

DON'T OVERDO IT! - Once at a "two-cycle" if the needle is closed further, the sound from the engine will stay smooth, but will weaken. The peak power of your engine occurs just at the break point from a rich "four cycle" setting and further, excessive leaning will ruin the engine. A too-lean setting raises the engine heat above the safe point, reduces lubrication, and destroys glow plugs due to high combustion temperature. This is very harmful to the engine and will shortly destroy your investment.

Learn to tune the engine before flying. Remember, "a little on the rich side is always preferred for longer motor life".

NOTE: The "high speed needle" is knurled knob and "idle mixture" is adjusted by the screw in the center of the moving barrel.


ACTUAL STARTING

  • Open the carburetor barrel about halfway. Open the high speed needle valve about 3~4 turns.
  • Choke the engine by placing your finger over the venturi and slowly turn the prop over three times counter clockwise. You should see fuel being drawn up the fuel line. If fuel is not drawn into the carburetor, open the main needle two more turns, unscrew the idle needle two turns and repeat the above.
  • Connect the 1.5 volt battery to the glow plug and pull the prop through until you feel a bump before compression. Now the engine will start with your chicken stick or electric starter.
  • Once the engine starts, open the carburetor to full throttle. At this time the engine should be running very rich. Slowly turn the main needle valve in and the engine should start speeding up. If it slows, dies or only starts with a brief bust of power and stops, the needle valve setting is too lean. Unscrew the needle 1 more turn and try again. If engine starts, runs slowly and briefly the mixture is too rich. Turn needle in 1/2 turn and restart.
  • IF THE ENGINE DOES NOT FIRE AT ALL, refer to the TROUBLE SHOOTING section in this text.
 

ADJUSTING THE R/C CARBURETOR

NOTE: The high speed needle is knurled knob and idle mixture is adjusted by the screw located in the center of the moving barrel.

K&B engines are fitted with a variable mixture carburetor which automatically alters both fuel and air mixtures as it's closed. Best and most reliable carburetor settings are obtained after engine break-in.

  • Start the engine and open the carburetor to the full open position, then adjust for peak R.P.M. with the main needle as previously described.
  • Close the carburetor barrel slowly until the lowest possible speed is reached without the engine stopping.
  • Go to full throttle after about 10 seconds of idling.
  • If the engine gains speed slowly, the idle mixture is too rich. If the engine stops, the idle mixture is too lean. Turn the idle needle clockwise if mixture is too rich and counterclockwise if too lean.

The engine will accelerate from idle to full throttle smoothly and instantaneously when properly adjusted. The engine may not idle well at a low setting or accelerate as quickly until it is well broken in.

-

BENCH BREAK-IN

NOTE THAT THE ENGINE MUST BE FIRMLY BOLTED INTO OR ONTO A SOLID TEST STAND. DO NOT CLAMP ENGINE IN A VISE. The supplied muffler should be used during bench break-in.

The initial bench break-in period is also approximately 45 minutes (20 to 25 minutes bench and 30 minutes airborne). During this time, use the recommended break-in propeller and run the engine at a rich to slow "4 cycle" setting. It is best to run the engine for about 10 minutes at a stretch and then allow it to cool. This heating and cooling cycle aids in break-in.

  • Start the engine and run it at a rich full throttle for about 1-1/2 minutes, then let it fast idle (about 3500 rpm's) for 30 seconds. Repeat this sequence for about 20 minutes of running time.
  • Increase the full open throttle time to about 3 minutes followed by a 30 second idling period. Do this for an additional for 20 minutes.
  • Install the engine in your aircraft. Using an normal size prop, proceed as described in the final step of the "AIRBORNE BREAK-IN".
-

AIRBORNE BREAK-IN

Care should be exercised when breaking in your engine using this method since you do not have "hands on" direct control of the engine should it run too lean too soon. Make certain that your radio equipment has the ability to "throttle down" your engine if needed.

  • BREAK-IN running should be done with the recommended propeller (see chart above) at a slightly rich setting. The needle valve should be set at a point just into this range from a four cycle setting. Fly the plane at maximum throttle for 2 minutes, then throttle back for approximately 30 seconds. Repeat this sequence until approximately 30 minutes of accumulated running time has been obtained. Additionally, certain maneuvers, such as "CUBAN EIGHT'S", that allow the engine to load and unload are recommended. AVOID PROLONGED MAXIMUM THROTTLE CLIMBING MANEUVERS.
  • After the first 30 minutes change to normal size prop and fly an additional 30 minutes. Continue to run the engine at a slightly rich four cycle setting and fly your normal pattern.
  • After the above break-in period, run the engine at a normal peak needle valve setting. This should be a little on the rich side because engines run leaner in the air. 5% - 15% nitro may be used.
-

TROUBLESHOOTING

Generally most engine starting problems can be traced to bad glow plugs, weak starting batteries, or inadequate fuel systems.
 

GLOW PLUGS

The glow plug, when connected to a 1.5 volt battery, should glow a bright orange.

  • If the plug only glows weakly (dull orange) the the starting battery should be recharged or, if the battery is OK, replace the plug.
  • If you see any leaks (bubbles) around the center post of your glow plug, replace the plug.
  • The glow plug element should be examined after several flights. If the element is deformed or touching the side of the plug body, replace the plug.
  • If the glow plug element is pitted or has a frosty look, the engine is running too lean and continued running will seriously harm the engine.
 

FUEL SYSTEMS

The most frequent problems encountered with fuel systems which could cause engine running problems are:

  • Improper fuel tank location. The center line of the carburetor should be located on the center line of the fuel tank.
  • Fuel pick up in tank is not free.
  • Dirt or contaminates in the fuel, tank, lines, filter or carburetor.
  • Holes in the fuel line. The tear resistance of silicon tubing is very low and it's not uncommon to develop a hole where the fuel line is assembled over the edges of brass tubing.
  • If the engine runs well on the first half of tank and then quits, it's almost always caused by a hole in the pick up line inside the tank. Look for bubbles in the fuel line, this is also a sign of holes.
 

MAINTENANCE

When you are finished flying for the day, run your engine dry by removing the fuel line at a moderate speed or allow the fuel tank to run dry. Squirt several drops of a good quality AFTER RUN OIL in the carburetor, then flip the propeller about 10 to 20 times. This oil will spread into the internal parts of the engine. Doing this religiously will keep castor based fuels from gumming up in the engine. After run oil will also protect internal engine parts from rust and corrosion. When storing your model between flying sessions, it is best to wrap your engine in a rag or plastic to prevent dust, dirt and moisture from entering the engine. The engine should also be wrapped in a rag at the flying field between flights.

Preventive Maintenance Hint: For a smoother running, less troublesome engine, check the tightness of all screws regularly.


OPERATION IN DIRTY OR DUSTY ENVIRONMENT

Dirt is the enemy of the model airplane engine. Your K&B engine is a precision piece or equipment with very close fitting metal components. The engine should always be protected from dirt or like foreign material. IF FOR ANY REASON DIRT ENTERS THE ENGINE DO NOT TURN IT OVER UNTIL IT HAS BEEN FLUSHED OUT COMPLETELY.

Alcohol is recommended for flushing. DO NOT USE carburetor cleaner or chlorinated industrial solvents as they may attack the plastic parts of the engine. The following steps may be used as a limited disassembly and re-assembly guide: (See warranty warning below about engine disassembly).

NOTE: TAKE CARE NOT TO DISASSEMBLE THE ENGINE BEYOND THE INSTRUCTIONS PROVIDED HERE. DOING SO WILL VOID YOUR WARRANTY COVERAGE

  • Remove carburetor, muffler and glow plug.
  • Remove the back cover and cylinder head.
  • Flush engine out completely using alcohol or mild solvent.
  • Reinstall back cover and head according to the instruction below.
  • Insert screws into head and tighten until they just begin to become tightened up. Then tighten the screws in the sequence shown below. Tighten the screws only slightly, repeating the sequence a number of times until the screws are tight
  • Install the glow plug and carburetor.
 

WARRANTY

All K&B engines returned for warranty service must be within the warranty terms as stated in this instruction sheet. Do not return the engine to the place of purchase. They are not authorized or equipped to perform warranty work on K&B products. When requesting warranty service, please observe the following:

Call K&B first to receive a returned goods authorization (RGA) number, at 626-359-9527.

Always send the complete engine including the carburetor.

  Include a note detailing the problem you are experiencing. Warranty service cannot be provided without this information. Include your daytime phone number, address, or e-mail address in the event we need to contact you for more details pertaining to the service you requested.

Tell us where you purchased you engine and when. A clear copy of your purchase receipt is required for you to receive a warranty consideration.

After you receive your RGA number and have prepared your written information, send the engine to us at:

K&B MODEL PRODUCTS, INC.
Attention: Warranty Department
1630 South California Avenue
Monrovia CA 91016


NON-WARRANTY SERVICE

 
If your engine is not eligible for warranty service and you wish to have it repaired, please, click here for repair service.
 

©2004-1998 Model Engine Corporation of America, All rights reserved.
K&B and the oval logo are Registered Trademarks of Model Engine Corp. of America
Registered U.S. Patent Office

No part may be reproduced without written permission from
MECOA/K&B -- P.O. Box 98 -- Sierra Madre, CA 91025 U.S.A.