| |
|
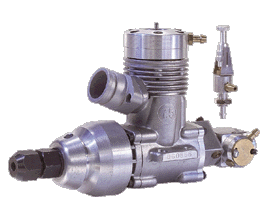
This
is an especially high performance engine designed for competition
in the
Mono, Hydro, and Deep-V R/C boating field. To fully realize
top performance
and longer life from this high performance racing engine,
please thoroughly read and heed the following text and instructions.
|
| |
|
|
|
SPECIFICATIONS
|
| Displacement
|
.452
Cu. In. (7.41cc) |
| Bore |
.870
(22.1mm) |
| Stroke |
.760
(19.3mm) |
| R.P.M. |
2,000
- 25,000 |
| Power
Output |
2.2
HP @ 25,000 |
| Weight |
14.7
Oz. (417g) |
| Propeller |
P-235 |
|
|
| |
|
WARNING
|
|
PLEASE
READ ALL SAFETY
INSTRUCTIONS! Failure to read, understand and follow
these instructions could result in personal injury and/or
property damage to yourself or others.
Take
a few moments to familiarize yourself with the various parts
of the engine. DO NOT DISASSEMBLE YOUR ENGINE! Doing so will
void your warranty. No exceptions!
|
| |
|
ENGINE
OPERATING NOTES
|
|
GLOW
PLUG: This engine is designed to use the Long Reach Glow
Plug (K&B P/N 7311).
FUEL: We recommend either K&B 525 (25% nitro) or
K&B Speed Fuel 550 (50% nitro). For your information,
525 fuel will give your engine more economy and longer life.
Speed fuel will give your engine more speed, less economy
and less life.
DRUM ROTOR: The drum rotor in this engine is made of
steel, then hardened and ground to a super smooth finish.
It runs in a bronze bushing, which gives the unit exceptionally
long life.
TUNED
PIPE: The recommended tuned pipe for this engine is one
of the following: MAC 1345 or MAC 1349 Muffled Pipe; Prather
9020 or Prather 9020 and 9060 Muffled Pipe combination.
|
| |
|
OPERATING
INSTRUCTIONS
|
|
If
you are unfamiliar with this line of carburetors or are a
new modeler, please do not attempt to start the engine until
you have read and understand the following instructions:
1.
NEEDLE VALVE SETUP
Locate
an area to install the remote needle valve assembly. This
assembly must be in the fuel line between the tank and the
carburetor. The line should not exceed five (5) inches in
total length.
2.
LINKAGE SETUP
Notice
the barrel will rotate 360 degrees. Using your radio and
trim functions, set the barrel movement for full open and
full close. IMPORTANT: THE
BARREL MUST CLOSE IN A CLOCKWISE ROTATION.
The opening in the barrel spraybar faces the crankshaft.
|
| |
|
NEEDLE
VALVE ADJUSTMENTS
|
|
Note
that there are two fuel metering adjustments:
1.
HIGH SPEED NEEDLE VALVE
This
needle valve, located on the Remote Needle Valve Assembly,
controls all the fuel that comes to the engine, whether
the engine is running at high, mid-range, or idle speeds.
It does not affect the low speed rich/lean setting. The
High Speed Needle Valve’s main function, however, is
to meter the high-speed fuel mixture.
2.
LOW SPEED and MID-RANGE ADJUSTMENT
The
rich/lean adjustment is controlled by the brass low speed
disk located on the side of the carburetor. Using the allen
wrench provided, turn the disc clockwise to “lean”
the mixture and counter-clockwise to “richen”
the mixture. The rich/lean mixture control is set at the
factory and may require only a fine adjustment for your
application. WARNING: DO NOT
RUN THE ENGINE AT A “LEAN” SETTING.
|
| |
|
NEEDLE
VALVE ADJUSTMENTS - GENERAL
|
| As a starting
point for the high speed needle adjustment, completely close
the needle valve (clockwise), then open it (counterclockwise)
three and a half turns. This setting is an average and may require
further adjustments. For higher altitudes (3,000 - 4,000 feet),
close needle valve approximately 1/2 turn. |
| |
|
PRESSURIZED
SYSTEM
|
|
All series
“94” carburetors must run with exhaust pressure
from the tuned pipe connected to the fuel tank.
|
| |
|
BREAK-IN
|
| Due to
the nature and design features of the “ABC” type engine,
the piston and sleeve have been set up to feel a little tight
at the top of the stroke. Once the engine has been started,
the sleeve will pull away from the piston leaving the exact
clearance necessary for maximum performance without seizing.
It’s for this reason that an “ABC” type engine
does not require prolonged break-in periods. However, we do
recommend that you run the engine at a slightly rich needle
valve setting for the first two runs. These runs should be made
with the engine installed in the boat and running in the water
for periods of not less than five (5) minutes each. Typically,
an engine will be ready for continuous full throttle and a racing
needle valve setting after ten (10) to fifteen (15) minutes.
|
| |
|
STARTING
THE ENGINE
|
|
The engine
runs in a counterclockwise rotation. Make certain that your
starter motor is running in the same direction. With the fuel
tank full, radio on, glow plug battery leads off, and your
finger covering the carburetor, spin the engine with the starter
for about a two second burst. This primes the engine. Now
open your throttle to the starting position. Connect the glow
plug battery leads and spin the engine again. The engine should
fire up and run. We recommend that you be near the water when
starting the engine so as not to overheat due to lack of water
circulation through the cooling jacket. It is also advisable
that you keep the engine at a slow, or not greater than a
fast idle, until you get it into the water, as over-revving
and overheating will damage your engine.
|
| |
|
MARINE
PROPELLERS
|
|
Propellers
are naturally an important factor. Most propellers that are
available on the market need balancing and “cleaning
up”. Unbalanced props can cause cracks on boat hulls,
not to mention robbing your engine of horsepower and your
boat of performance. So, balancing the prop is very important.
It is difficult to recommend the propeller for your particular
boat, as much depends on the nitromethane percentage fuel
you may use. Propeller depth and strut angle are also important
factors. However, as a start, the following will have you
in the ball park:
|
Hydros
|
Octura No. X447 or Prather No. 245
|
|
Deep Vees
|
Octura No. X445 or Prather No. 235
|
|
| |
|
OTHER
RECOMMENDATIONS
|
|
We recommend
that you use a filter in your fuel system. Install the filter
on the fuel pickup tubing between the tank and the needle
valve.
At the
end of each day’s running, remove the glow plug and,
by spinning the engine with the starter, flush at least two
ounces of fuel through the engine by holding your finger over
the carburetor. Disconnect the fuel line and continue to spin
the engine until dry. To prevent fuel from spraying into your
eyes, keep face away from the glow plug opening, or shield
the hole with a rag or towel. Next, pour an amount of after-run
engine oil into the carburetor and spin the engine again for
a short burst. Replace the glow plug. Remove drive cable and
re-lube.
|
| |
|
MAINTENANCE
|
| We recommend
after each days running, that you check each bolt and screw
for tightness. |
| |