|
|
|
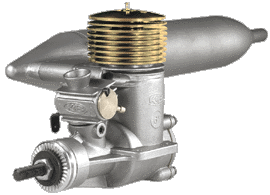
SPECIFICATIONS
|
|
Displacement
|
.61
Cu. In. (10cc)
|
|
Bore
|
.940
(23.88mm)
|
|
Stroke
|
.880
(22.35mm)
|
|
Compression
|
7.5
: 1
|
|
R.P.M.
|
14,000
|
|
POWER
OUTPUT
|
2.0
HP @ 14,000
|
|
Engine
Weight
|
14.25
Oz. (404g)
|
|
| |
|
WARNING
|
|
PLEASE
READ ALL SAFETY
INSTRUCTIONS! Failure to read, understand and follow
these instructions could result in personal injury and/or
property damage to yourself or others.
Take
a few moments to familiarize yourself with the various parts
of the engine. DO NOT DISASSEMBLE YOUR ENGINE! Doing so will
void your warranty. No exceptions!
|
| |
|
CARBURETOR
OPERATING INSTRUCTIONS
|
|
The carburetor
enables easy adjustment of the idle speed, idle mixture, and
the high speed mixture.
1. High
Speed Needle Valve
Locate
an area to install the Remote Needle Valve Assembly using
the bracket provided. This may typically be attached to the
firewall, cowl or rear engine mount lug area. This assembly
must be in the fuel line between the tank and the carburetor.
The line should not exceed five (5) inches in total length.
2. High
Speed Needle Valve Adjustment
This
needle valve, located on the Remote Needle Valve Assembly,
controls all the fuel that comes to the engine, whether the
engine is running at high, mid-range, or idle speeds. It does
not affect the low speed rich/lean setting. The High Speed
Needle Valve's main function, however, is to meter the high-speed
fuel mixture.
3. Low
Speed and Mid-Range Adjustment
The
rich/lean adjustment is controlled by the brass low speed
disk located on the side of the carburetor. Using the allen
wrench provided, turn the disc clockwise to "lean"
the mixture and counter clockwise to "richen" the
mixture. The rich/lean mixture control is set at the factory
and may require only a fine adjustment for your application.
WARNING: Do not run
the engine at a "lean" setting.
|
| |
|
ENGINE
INSTALLATION
|
| Engine
and Fuel Tank: The engine may be installed upright, on either
side, or inverted. In any position, however, be certain that
the engine is securely bolted into place. |
| |
|
ENGINE
BREAK-IN
|
| We recommend
that you mount your engine to a break-in stand to familiarize
yourself with it and with the carburetor operation. It is strongly
recommended that fuels containing more than 10 to 12% nitromethane
be avoided until the engine has been operated about one hour.
For the initial flights, adjust the engine to a slightly "burbling"
sound and a smoky exhaust. After each tank of fuel the engine
can be "leaned" until about one gallon of fuel has
been consumed. For both break-in and general operation K&B
500 should be used. |
| |
|
SCREW-ON
HEAD
|
| The screw-on
head on your new .61 ABC engine has been torqued to 26 foot
pounds at the factory. After you have run 2 to 3 gallons of
fuel through the engine, check the head for tightness with the
spanner wrench supplied. Check the head immediately after a
flight so the engine will be at running temperature. Support
your engine by firmly holding the prop and front of the engine
so as to not break engine mount loose from the firewall.
NOTE: The head is installed at the factory
with anti-seize. Before reinstalling head, make sure threads
are clean and reapply anti-seize to threads. |
| |
|
PROPELLERS
|
| For most
airplanes, a twelve (12) inch diameter with eight (8) inch pitch
is recommended. For larger and heavier models, a thirteen (13)
inch diameter with six (6) inch pitch can be used. Whatever
propeller is used, make certain it is properly balanced to prevent
excess vibration. |
| |
|
GLOW
PLUGS
|
| Use a K&B
No. 7311 Long Reach Glow Plug. |
| |
|
STARTING
THE ENGINE
|
|
With a
full tank of fuel and an ignition battery of no more than
1.5 volts, proceed as follows:
1. With
the booster battery disconnected and with the throttle wide
open, place finger tip over the carburetor venturi and flip
the propeller quickly two or three times, to prime the engine.
2. Remove
finger tip from the carburetor inlet and continue to flip
the propeller several times.
3. Close
the carburetor to approximately one-quarter (1/4) open and
connect the battery to the glow plug.
4. Slowly
turn the propeller (counterclockwise) and "feel"
for a momentary resistance, which indicates ignition of the
mixture in the cylinder.
5. Quickly
flip the propeller to start the engine and, then, disconnect
the battery.
|
| |